Sand Test : Field vs Lab – Sand testing is essential in construction to ensure the quality and strength of materials. This blog explores the difference between field and laboratory tests for sand, covering key methods, IS codes, and practical insights.

Table of Contents
Introduction
Sand is one of the most important materials in construction. It is used in making concrete, plaster, and mortar, which are the backbone of any building. But not all sand is the same. Its quality can affect the strength and durability of a structure. That’s why it is important to test sand before using it in construction.
Sand testing is done in two ways—field testing and laboratory testing. Field tests are quick, simple, and done on-site to get a rough idea of the sand’s quality. Laboratory tests, on the other hand, are more detailed and scientific. They are conducted in a controlled environment to check the exact properties of the sand.
In this blog, we will discuss both types of tests, their importance, and how they help in ensuring the right sand is used in construction. We will also look at the Indian Standards (IS codes) that define the quality of sand. Whether you are a civil engineer, a contractor, or someone interested in construction, this blog will help you understand sand testing in a simple and clear way.
What is Sand?
Sand is a naturally occurring material made of tiny rock particles and mineral grains. It is one of the most widely used materials in construction. Sand is formed due to the weathering of rocks over thousands of years. The main component of sand is silica (SiO₂), but it can also contain other minerals like quartz, feldspar, and mica.
In construction, sand is used for making concrete, plaster, mortar, and flooring. It helps in providing strength and durability to structures. However, not all sand is suitable for construction. The quality of sand must be tested before using it.
Types of Sand in Construction
1. River Sand
Naturally found in riverbeds.
Has smooth and rounded grains.
Best for concrete and plastering.
Clean and free from clay and organic materials.
2. Pit Sand
Found in deep pits, mostly in dry river beds.
Coarse and angular in texture.
Contains clay and silt, which need to be washed before use.
Good for mortar but not suitable for plastering.
3. M-Sand (Manufactured Sand)
Artificially made by crushing hard stones.
Has angular grains and rough texture.
Used as a substitute for river sand in concrete.
Free from impurities and has better strength.
4. Sea Sand
Found in coastal areas.
Contains salt, which can cause rusting in reinforcement steel.
Not recommended for construction unless washed properly.
5. Desert Sand
Found in deserts and has fine, round grains.
Not suitable for construction due to its smooth texture.
Does not bond well with cement and water.
IS Codes for Sand in Construction
Indian Standards (IS) provide guidelines for the quality of sand used in construction. Some important IS codes are:
IS 383:1970 – Specifies the quality of coarse and fine aggregates (sand) for concrete.
IS 2386 (Part I-VI) – Covers different tests for sand, including grain size, strength, and impurities.
IS 1542:1992 – Specifies the requirements for sand used in plastering.
IS 2116:1980 – Specifies the quality of sand for masonry work.
These IS codes ensure that sand used in construction is of good quality and does not weaken the structure.
Uses of Sand in Construction
1. Concrete (RCC & PCC)
Sand is used in concrete to provide strength and stability.
RCC (Reinforced Cement Concrete) – Used in beams, columns, and slabs with steel reinforcement.
PCC (Plain Cement Concrete) – Used for flooring, foundations, and road construction without reinforcement.
2. Mortar
Sand is mixed with cement and water to create mortar.
Used for brickwork, plastering, and tile fixing.
Provides bonding strength between bricks and blocks.
3. Plastering
Sand is used in wall plastering to create a smooth and strong surface.
Fine river sand or M-sand is preferred for better finish and durability.
4. Flooring
Used in different types of flooring, including cement and tile floors.
Helps in leveling and creating a solid base for floor tiles.
5. Filling & Leveling
Used to fill gaps and level the ground in construction sites.
Provides a stable foundation before laying concrete or flooring materials.
Properties of Sand
Sand has several physical and chemical properties that make it suitable for construction. Below are some key properties:
1. Grain Size & Gradation
Sand particles should be well-graded (combination of fine, medium, and coarse grains) to improve strength in concrete.
As per IS 383, sand is classified based on particle size:
Fine sand (0.075 mm – 0.425 mm)
Medium sand (0.425 mm – 2 mm)
Coarse sand (2 mm – 4.75 mm)
2. Shape & Texture
Angular sand provides better bonding in concrete and mortar.
Rounded sand is smoother and improves workability but reduces strength.
Rough-textured sand offers better adhesion with cement.
3. Specific Gravity
The specific gravity of good-quality sand is 2.6 – 2.8.
Lower values indicate the presence of lightweight impurities.
4. Bulk Density
Bulk density varies between 1.45 to 2.0 g/cm³, affecting compaction and strength.
5. Water Absorption & Moisture Content
Good-quality sand absorbs less than 3% water.
Excess moisture affects workability and strength in concrete.
6. Silt & Clay Content
Silt content should not exceed 8% for concrete and 3% for plastering.
High silt reduces the bond between cement and sand, leading to weak structures.
7. Hardness & Durability
Sand should be hard and durable to withstand weathering.
Weak or flaky sand leads to premature failure of concrete.
8. Chemical Stability
Sand should be free from salts, organic matter, and alkalis that can cause corrosion in reinforcement bars (RCC structures).

Which is the Best Sand for Construction & Environmental Safety?
The best sand for construction should be strong, durable, and environmentally sustainable. Below are the most suitable types:
1. M-Sand (Manufactured Sand) – Best for Environment & Construction
Why?
Artificially manufactured by crushing rocks into fine particles.
Has controlled grain size and fewer impurities.
Reduces the use of river sand, preventing environmental damage.
Eco-friendly and cost-effective alternative to natural sand.
Improves concrete strength due to angular particle shape.
2. River Sand – Good but Not Environmentally Friendly
Why?
Naturally available and has smooth texture.
Well-graded and provides good workability in concrete.
Environmental Concern:
Excessive river sand mining leads to erosion, habitat destruction, and water depletion.
Increases flood risks and affects aquatic ecosystems.
3. Sea Sand – Not Recommended
Why?
Contains high salt content, which corrodes steel reinforcement in RCC.
Requires washing and processing to remove salts, increasing costs.
4. Pit Sand – Good but Needs Processing
Why?
Found in deep pits away from rivers.
Sharp, angular grains provide good strength.
Limitation:
Contains high clay content, which must be removed before use.
Best Choice for Construction & Environment
M-Sand (Manufactured Sand) is the best option because it is:
Eco-friendly (reduces river sand mining).
Strong & durable (better bond with cement).
Free from silt & impurities.
Easily available & cost-effective.
Tests for Sand
Field Tests for Sand
1. Visual Inspection Test
2. Grain Size Test
3. Clay & Silt Content Test (Hand Wash Test)
4. Moisture Content Test (By Hand Feel)
5. Presence of Organic Impurities Test
6. Bulking of Sand Test (By Bottle Method)
Lab Tests for Sand
1. Sieve Analysis Test
2. Specific Gravity Test
3. Bulk Density Test
4. Moisture Content Test
5. Silt Content Test (By Decantation Method)
6. Organic Impurities Test (Color Comparison Test)
7. Bulking of Sand Test (By Laboratory Method)
8. Fineness Modulus Test
Field Tests for Sand
Field tests for sand are simple, quick, and can be conducted on-site without any laboratory equipment. These tests help in checking the basic quality of sand before using it in construction. Let’s go through each field test in detail:
1. Visual Inspection Test
Purpose: To check the color, texture, and cleanliness of the sand.
Procedure:
Take a handful of sand and observe it under natural light.
Good-quality sand should have a light brown or reddish-brown color (for river sand) and a grayish-white color (for M-sand).
Sand grains should be angular or sub-angular (not too round) to ensure proper bonding with cement.
It should be free from clay lumps, mica, organic impurities, and salt particles.
The sand should not have any visible dirt, grass, or other debris.
Result Interpretation:
If the sand appears clean and uniform, it is good for construction.
If it has too much clay, salt, or dark patches, it is not suitable.
2. Grain Size Test
Purpose: To check the fineness and size distribution of sand particles.
Procedure:
Take a small sample of sand in your hand.
Allow it to pass through your fingers and observe the size of grains.
Ideally, sand should have a mix of fine, medium, and coarse grains.
If sand is too fine (like powder), it may not be good for concrete.
If it is too coarse, it may not work well for plastering.
Result Interpretation:
Good-quality sand has well-graded grains (a proper mix of sizes).
Sand with too many fine particles may lead to cracks in concrete.
Sand with only large grains may not provide good bonding in mortar.
3. Clay & Silt Content Test (Hand Wash Test)
Purpose: To check the presence of clay and silt, which weaken the strength of sand.
Procedure:
Take a handful of sand and put it in a bucket of clean water.
Stir it well and let it settle for 30-60 seconds.
If the water becomes muddy or brown, the sand has too much silt or clay.
Good-quality sand should not make the water too cloudy.
Result Interpretation:
If water remains clear or slightly hazy, the sand is clean.
If water turns dark brown or muddy, the sand has too much silt and is unsuitable for construction.
4. Moisture Content Test (By Hand Feel Method)
Purpose: To check the amount of moisture present in the sand.
Procedure:
Take a handful of sand and squeeze it tightly in your fist.
Observe the behavior of the sand when you open your hand.
Result Interpretation:
If sand sticks together and forms a lump, it has high moisture content.
If it falls apart immediately, it is dry.
If it lightly holds together but crumbles with touch, it has moderate moisture (which is ideal).
Note: Excess moisture in sand can increase the water-cement ratio in concrete, leading to weak structures.
5. Presence of Organic Impurities Test
Purpose: To check if sand contains decayed leaves, roots, or other organic matter.
Procedure:
Take a small amount of sand and smell it.
If there is a musty or earthy odor, the sand contains organic matter.
Spread the sand on a white paper and observe if it has black or dark brown particles.
Result Interpretation:
Good-quality sand should have no strong smell and should look clean.
If it has black or dark patches, it contains impurities and should not be used in RCC structures.
6. Bulking of Sand Test (By Bottle Method)
Purpose: To check how much the volume of sand increases due to moisture.
Procedure:
Take a transparent measuring bottle (1-liter capacity).
Fill it with sand up to 500 ml mark (dry sand).
Now, add water gradually and shake the bottle.
Observe how much the sand level rises.
Result Interpretation:
If the sand level increases significantly (by 10-30%), it means the sand has a high bulking effect due to moisture.
The bulking effect should be considered while measuring sand in concrete mix design.
If bulking is high, water-cement ratio should be adjusted accordingly.

Lab Tests for Sand
Laboratory tests are conducted to determine the physical and chemical properties of sand, ensuring its suitability for construction work. These tests require proper equipment and follow standard procedures as per Indian Standards (IS codes). Below are the detailed descriptions of different laboratory tests conducted on sand.
1. Sieve Analysis Test
Purpose:
To determine the particle size distribution of sand and check whether it falls under fine, medium, or coarse sand as per IS 383.
Apparatus Used:
IS Sieves (4.75 mm, 2.36 mm, 1.18 mm, 600 µm, 300 µm, 150 µm, and 75 µm)
Weighing balance (accuracy 0.1 g)
Sieve shaker
Tray and brush
Procedure:
1. Weigh 1 kg of dry sand sample using a weighing balance.
2. Arrange the sieves in descending order, with the largest sieve (4.75 mm) on top and the smallest (75 µm) at the bottom.
3. Place the sand in the top sieve and cover it.
4. Put the sieves in the mechanical sieve shaker and shake for 10 minutes.
5. Remove the sieves and weigh the sand retained on each sieve.
6. Calculate the percentage retained on each sieve.
7. Compute the Fineness Modulus (FM) using the formula:
FM (% Retained) = (Weight retained on sieves/ Total Dry Weight )*100
FM = {Cumulative % retained on standard sieves 1 + Cumulative % retained on standard sieves 2 +Cumulative % retained on standard sieves 3 +Cumulative % retained on standard sieves N }/{100}
Result Interpretation:
Fine sand: FM < 2.2
Medium sand: FM = 2.2 to 2.6
Coarse sand: FM > 2.6
If the sand does not meet the IS 383 grading requirements, it is unsuitable for concrete and mortar.
2. Specific Gravity Test
Purpose:
To determine the specific gravity (SG) of sand, which helps in assessing its strength and water absorption properties.
Apparatus Used:
Pycnometer bottle (1-liter capacity)
Weighing balance
Water
Oven (for drying sand)
Procedure:
1. Weigh the empty pycnometer bottle (W1).
2. Fill the bottle with dry sand up to half and weigh it (W2).
3. Add water to completely submerge the sand, shake well, and weigh it (W3).
4. Empty the bottle, fill it completely with water, and weigh it again (W4).
5. Calculate the specific gravity using the formula:
SG = {W2 – W1}/{(W2 – W1) – (W3 – W4)}
Result Interpretation:
Good-quality sand has a specific gravity between 2.6 to 2.8.
If the SG is less than 2.5, the sand is too light and may not be strong enough.
3. Bulk Density Test
Purpose:
To determine the weight of sand per unit volume, which helps in mix design calculations.
Apparatus Used:
Cylindrical metal container (3-liter capacity)
Weighing balance
Tamping rod
Procedure:
1. Weigh the empty container (W1).
2. Fill the container with sand without compacting and weigh it again (W2).
3. Repeat the test by compacting the sand with a tamping rod and weigh it (W3).
4. Calculate the bulk density using the formula:
Bulk Density = {Weight of sand}/{Volume of container}
Result Interpretation:
Loose Bulk Density: 1400 to 1600 kg/m³
Compacted Bulk Density: 1600 to 1800 kg/m³
Lower bulk density indicates more voids in the sand, which affects the strength of concrete.
4. Moisture Content Test
Purpose:
To determine the water content in sand, which affects the water-cement ratio in concrete mix.
Apparatus Used:
Weighing balance
Oven (105°C to 110°C)
Metal tray
Procedure:
1. Weigh 500 g of sand (W1).
2. Place it in a metal tray and dry it in an oven at 105°C for 24 hours.
3. Remove, cool, and weigh it again (W2).
4. Calculate the moisture content using the formula:
Moisture Content = [{W1 – W2}/{W2}] * 100
Result Interpretation:
If moisture content exceeds 6%, sand should be dried before use in concrete.
Excess moisture affects the workability and strength of concrete.
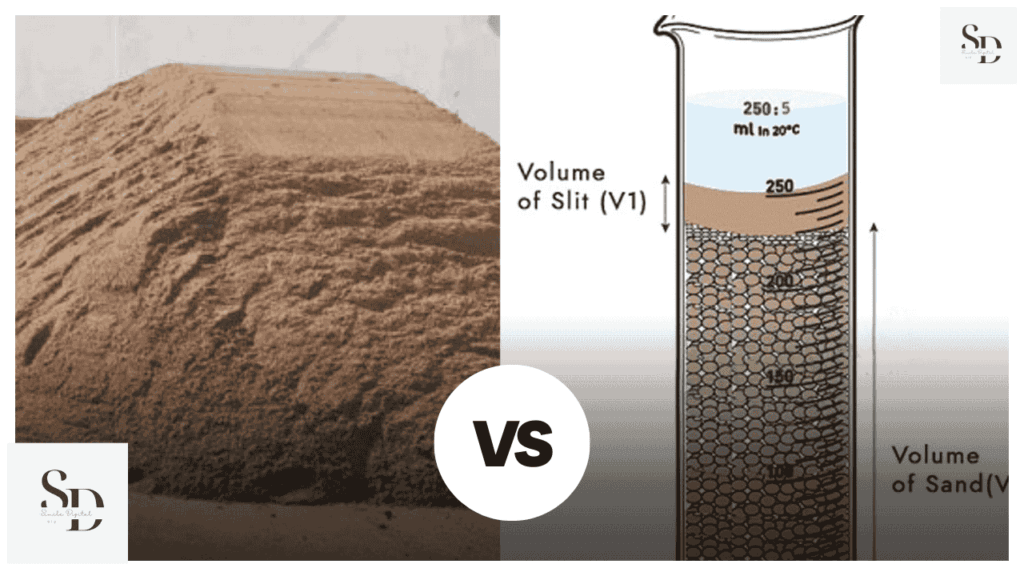
5. Silt Content Test (By Decantation Method)
Purpose:
To check the percentage of silt content, as excessive silt weakens the bonding in concrete.
Apparatus Used:
Measuring cylinder (1-liter capacity)
Water
Salt (to improve visibility of silt layer)
Procedure:
1. Fill sand up to 100 ml in the measuring cylinder.
2. Add water up to 200 ml and shake well.
3. Allow it to settle for 2 hours.
4. Observe the silt layer above the sand layer.
5. Measure the height of silt layer (H1) and the total height of sand (H2).
6. Calculate the silt content percentage:
Silt Content = [{H1}/{H2}] * 100
Result Interpretation:
IS Code Limit (IS 2386): Silt content should not exceed 8% for concrete and 3% for plastering.
If silt content exceeds the limit, sand should be washed before use.
6. Organic Impurities Test (Color Comparison Test)
Purpose:
To check the presence of organic matter (decomposed vegetation, humus, etc.), which weakens concrete.
Apparatus Used:
Glass bottle (transparent)
Sodium hydroxide (3% solution)
Sand sample
Procedure:
1. Fill half the bottle with sand.
2. Add sodium hydroxide solution and shake well.
3. Let it stand for 24 hours.
4. Observe the color of the solution.
Result Interpretation:
Light yellow or colorless solution → Sand is free from organic impurities.
Brown or dark solution → Sand contains organic matter and is not suitable for construction.
Books
1. Building Materials – S.K. Duggal
2. Building Materials – P.C. Varghese
3. Testing of Construction Materials – A.M. Neville & J.J. Brooks
4. Material Testing for Civil Engineering – V.N. Vazirani & S.P. Chandola
5. Sustainable Construction Materials: Sand and Silica Fume – Jamal Khatib
6. The World in a Grain: The Story of Sand and How It Transformed Civilization – Vince Beiser
Conclusion
Sand is one of the most crucial materials in construction, playing a vital role in various applications such as concrete, mortar, plastering, and flooring. The quality of sand directly affects the strength, durability, and stability of structures. To ensure that the sand used in construction is of high quality, it must be tested through both field and laboratory methods.
Field tests like visual inspection, touch test, silt content test, and organic impurity test provide quick on-site assessments, helping engineers make immediate decisions. However, to obtain accurate and standardized results, laboratory tests such as sieve analysis, specific gravity test, bulk density test, and moisture content test are essential. These tests help determine the grading, strength, and workability of sand, ensuring it meets the Indian Standards (IS 383, IS 2386, IS 456, etc.).
Poor-quality sand can lead to weak concrete, increased cracks, and long-term durability issues in construction. Therefore, every batch of sand should be properly tested and verified before use. Proper testing ensures that the right sand is selected for the right application, leading to stronger and more durable buildings, roads, and other structures.
Thank You Note
Thank you for taking the time to read this detailed guide on sand testing. Understanding the importance of testing sand helps in maintaining the quality, safety, and durability of construction projects. Whether you are a civil engineer, contractor, student, or construction enthusiast, this knowledge is essential in ensuring the best materials are used for strong and long-lasting structures.
If you found this guide useful, feel free to share it with others in the construction industry. Stay tuned for more informative content on construction materials and testing methods.
Happy learning and building!
Frequently Asked Questions (FAQs)
Why is sand testing important in construction?
What is the IS code for testing sand quality?
IS 383 – Specification for fine aggregates (sand)
IS 2386 (Part I to Part VI) – Methods of testing aggregates, including sand
IS 456 – General guidelines for using sand in concrete
What are the main field tests for sand quality?
Visual inspection test (for color and particle size)
Touch test (to check smoothness and fineness)
Silt content test (to check for excessive fine particles)
Organic impurities test (to detect decomposed matter)
What are the key laboratory tests for sand?
Sieve analysis test (for grading and fineness modulus)
Specific gravity test (to determine density and strength)
Bulk density test (to check compactness)
Moisture content test (to control water-cement ratio in concrete)
Silt content test (to check excessive fines)
Organic impurities test (to check for harmful substances)
What is the acceptable silt content in sand?
How does moisture content in sand affect concrete?
What is the ideal specific gravity of sand?
Note for Readers
If you’d like to read this blog in your regional language or any other international language, simply click on the Google Translator option located in the bar at the top of the page. This feature allows you to select your preferred language and enjoy the content in a way that’s comfortable for you. We hope this makes your reading experience more enjoyable and accessible!
Disclaimer
This article is intended for educational and informational purposes only. While every effort has been made to ensure the accuracy of the information provided, users are advised to refer to official IS codes and professional guidelines before conducting any sand testing in real-world applications. The author is not responsible for any construction defects, losses, or damages resulting from improper sand testing procedures.
For professional guidance, consult a certified civil engineer or testing laboratory.
For more exciting topics, explore our other articles here
3 Comments